You’ll learn everything you need to know about v-ups in this post, including their advantages, proper technique, different variations, and more.
The V-up is a full-body core exercise that gets its name from the shape your body assumes while doing it. Although you can choose to add weights to your V-ups workout, it can be done anywhere with just your body weight and some floor space. The most popular V-ups forms make it simple to learn how to perform them. V-ups are excellent core and stability-building exercises that help you with movements like walking, running, and lunging.
What is a V-Up?
What kind of exercises are V-ups? A core exercise called a V-up targets both the upper and lower abs. You must simultaneously raise your arms and legs off the ground while using your abdominal muscles. The proper form of the V-ups resembles the letter “V.”‘ You raise your legs like you’re doing leg raises while raising your torso like you’re doing a sit-up.
Exercises involving V-ups can be performed with or without weights. They are crucial for developing core stability so that your pelvis and spine are correctly aligned. The balance, stability, and good posture that a stronger core promotes also help with lower back pain.
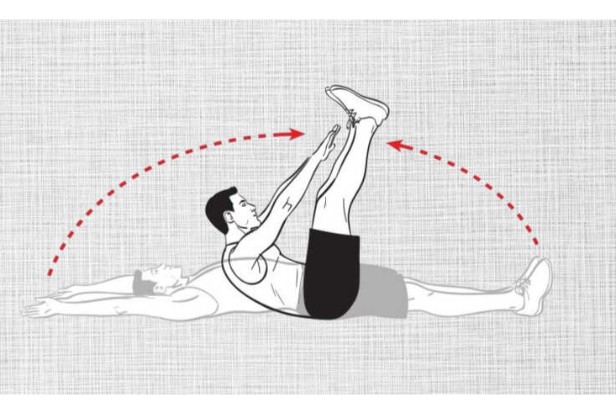
How to Do a V-Up Properly
- Lay face-up on the floor with your arms and legs straight and just slightly elevated.
- Lift your torso and legs all at once, as if you’re attempting to touch your toes.
- Return to a lower position. That’s one rep.
Form tips: Please, rather than arching your back when you’re lying down, start with your abs engaged and your lower back touching the ground. I can’t stress this enough. If you don’t, your lower back may be severely uncomfortable or painful. Another crucial piece of advice is to make sure your upper body, not your legs, initiates the coming up motion. Utilizing that core is crucial here once more.
Reps/sets for best results: I’d advise beginning with three sets of twelve. Then, as you advance, you can perform as many reps as you can in three rounds of 45 seconds or three sets of 15 repetitions.
Benefits of a V-Up
Core power in two words. Always keep in mind that this exercise uses only your bodyweight as resistance, so you should do it carefully. To lift your torso so that it is almost touching your legs, you will have to rely on your core strength. Significant upper and lower ab work is required for the move. When done correctly, you’ll notice some core definition pretty quickly.
What Muscles Do V-Ups Work?
The lower body and core muscles are worked when performing v-ups. Rectus abdominis and oblique muscles are the main muscles used. V-ups work your hip flexors, adductors, and quadriceps because they require you to lift your legs off the ground.
- Rectus abdominis. The pubic bone and this muscle are situated in front of the pelvis. Its primary job is to move the body part that is situated between the ribcage and the pelvis. The phrase “six pack” is frequently used to describe it.
- Obliques on the outside. The rectus abdominis has these muscles on either side of it. They aid in your trunk-twisting.
- Muscles of the internal oblique. Within the hip bones and beneath the external oblique muscles are these muscles. However, they function in the opposite direction from the external oblique muscles, which they assist in twisting the trunk with.
- Hip flexors. Along the front of your upper thigh, there is a row of muscles located. They cooperate to allow you to run, sit, and stand by flexing and stabilizing your hip, thigh, and torso. Aside from that, they aid in knee flexion and hip rotation.
- Adductors. The muscles in this group, which extend from the pelvis to the femur, are located in the middle of your thigh. In order to maintain balance while walking, they aid in thigh movement and pelvic stability.
- Quadriceps. Your front thigh is where you’ll find this collection of muscles. Their main function is to assist in straightening your knee. In addition, they support maintaining proper posture and balance as well as controlling your gait.
Variations of the V-Up
There are lots of entertaining ways to change up this move. Here are a few options for you, whether you want to modify your v-up after a strenuous abs workout or test your core strength even more.
- Try tuck ups: Start by lying face-up on the floor with your lower back touching the floor and your arms and legs straight but slightly elevated. Instead of attempting to touch your toes like you did in the v-up, however, bring your knees in toward your chest this time as you lift up, and make sure to hug them at the top of the position. Releasing after a moment, start over. This will relieve stress on the hip flexors.
- Turn them into alternating jackknives: This is essentially a v-up with one leg raised at a time. This is always a great variation because it will make your obliques work harder.
- Go for straddle v-ups: Once more, begin by laying face-down on the ground and lifting your arms and legs just a little bit off of the surface. You’re going to straddle your legs out to the side and upwards while reaching your arms toward the center, as opposed to lifting them straight up as you did in the v-up. I love doing exercises like this for my core. Compared to a regular v-up, it will focus even more on your lower abs.

Benefits of V-Up
You are not alone if you can’t perform more than 10 to 12 repetitions of the V-sit abdominal exercise before you reach failure. The V-sit is an efficient way to target the rectus abdominis, external obliques, internal obliques, and hip flexors while improving core and trunk balance. Exercise is effective when you can feel the burn.
This movement will look somewhat familiar to those who have practiced yoga or Pilates before. Building your core strength, balance, and coordination can help you maintain good posture, catch yourself to avoid falls, and perform better at a variety of physical activities2. It resembles the Boat Pose and involves lifting the arms and legs higher to move into a V-shaped position.
How to Add the V-Up to Your Routine
- Add them to your core warm up: V-ups are a fantastic exercise to perform at the start of a workout. As a result, your muscles will receive more oxygen and blood. They will increase your heart rate.
- Do them in between other moves: Consider that you are performing a chest press after a seated row. To make your circuit three exercises this time, try adding v-ups in between the exercises. Your upper body work will be maximized as a result, making you stronger overall.
- Do them as a finisher: At the end of your workout, v-ups will raise your heart rate once more, ensuring that blood and oxygen are getting to all the right places. You’ll feel it in your core right away.
Common Mistakes
For the most benefit from this exercise, avoid making these mistakes.
Rounding Back and Shoulders
When performing the V-sit, rounding the shoulders and back at the end of the exercise is one of the most frequent errors made. The back and legs form a V at the top of a genuine V-sit ab exercise. Bending your back forward takes the focus off the core and puts a strain on the lower back, leaving less control work for your abs making the exercise less effective.3
The exercise is made simpler by doing this, but your back may be more dangerous as a result. Rather, keep your spine in a straight line from your lower back up through your neck, head, and back. As you begin the movement, your entire body should remain in a straight position.
Swinging the Arms
When performing the V-sit, another error is swinging the arms upwards while lifting the legs and back. The exercise’s ability to work the core muscles lessens when the arms are moved. Instead, begin in the starting position with your arms at your sides.
Your arms should remain at your sides and parallel to the ground while you lift. Instead of pointing your fingers at your toes as you lift, keep your arms parallel to the ground.
Modifications and Variations
Because the V-sit is an intermediate ab exercise, you might have to gradually progress to the full variation. Once you’re proficient, you can introduce new difficulties.
Need a Modification?
If you’ve never done the V-sit before, keep in mind that form is more crucial than reps.
To begin with, you can raise your legs while supporting your trunk on your elbows to maintain stability. The following step is to support your trunk while having your arms extended (elbows soft or slightly bent) and pressed against the floor close to your hips. Once you are able to do the exercise with good form, you can progress to doing it with arms raised parallel to the floor.4
If the full version is too difficult, a modified version of the V-sit ab exercise will aid in improving your form and core strength. The knees bend at a 90-degree angle and are brought toward the chest as you lift rather than remaining straight throughout the movement. Legs are returned to their original position when you release or lower. Your back and head alignment remain straight throughout the modified V-sit.
Up for a Challenge?
Sitting on an unstable surface, such as a balance disk or a BOSU trainer, will make this exercise more difficult.
Safety and Precautions
Discuss whether this exercise is suitable for you if you have any neck or back issues with your physician or physical therapist. If done incorrectly, it can compress the spine and strain the neck. You can expect to feel your core muscles working, even burning, but stop if you feel any sharp pain.3
Avoid this exercise after the first trimester of pregnancy, as soon as the belly expands.