A popular isolation exercise for the obliques and rectus abdominis (abs) is heel touches, also known as alternating heel taps. The transverse abdominis can be effectively activated throughout the movement with the right form.
It is crucial for spinal stability and a healthy, strong lower back to strengthen your inner abdominal muscles (internal obliques and transverse abdominis). You require this to carry out a number of exercises, including heel touches. This won’t be the best exercise for a high calorie burn because it is primarily an isolation exercise. You can do this and up the difficulty of your workout by incorporating cardio-based abdominal exercises.
Why Do Heel Touches Occur?
Heel touches are a very versatile exercise that is obliquely focused. This exercise can slim your waist and generally strengthen your core for people of all fitness levels, from beginners to experts. Depending on your level of fitness, you can perform it using just your bodyweight or additional resistance. Your oblique muscles will tighten as you squeeze with each touch as you alternate your reach towards each heel. Essentially, you are toning your entire core with each rep. Maintaining our stability and balance as we age is important. You can make sure you do that by incorporating frequent heel touches into your abdominal exercise.
What Muscles Are Heel Touches Active In?
The front and side of the obliques (internal and external) are worked by heel touches. This exercise involves lifting the head and shoulders off the floor while contracting the transverse abdominal muscles (TVA). The rectus abdominis, or “six pack” muscles, remain statically contracted throughout the exercise. Hip flexor flexibility improvement is a benefit of performing heel touches.
Transverse Abdominis (TVA): Behind the rectus abdominis, along the abdominal walls, is a thick layer of muscles known as the transverse abdominis. In addition to supporting and stabilizing the organs, these muscles also assist in maintaining spinal alignment. Without these stabilizing muscles, movement of any limbs is all but impossible.
Rectus Abdominis: The long frontal muscle of the abdominal wall known as the rectus abdominis. Often referred to as “the six pack”, it sits in the center of the core or trunk. These muscles won’t be visible if there are additional fat layers present. They start and end below the sternum, down to the pubic bone. Frontal flexion toward the pelvis is the rectus abdominis’ primary job. Most likely, movements like crunches in a rocking motion or sit-ups come to mind, as well as static holds like those shown during heel touches.
External Obliques: The external obliques are larger than this muscle, which is situated laterally to the rectus abdominis but more in the frontal region. It is quite large, reaching from the lower ribs all the way to the pelvis. If you don’t have these muscles, you can’t twist your torso. The internal and external obliques complement one another. As an illustration, the left side internal oblique and right side external oblique both contract simultaneously when the torso twists to the left during a russian twist!
Hip Flexors: Your legs and trunk can be brought together in a variety of ways with the aid of your hip flexors, a group of several muscles. Your hip flexors are a gateway to do this, whether bending the knees to drive them in or bending at the waist to meet the legs.
Internal Obliques: This muscle is situated above the transverse abdominis on the lateral side of the rectus abdominis. It is the only layer of the abdominal wall and is very thin. The internal obliques can contract bilaterally, or simultaneously. Use a hollow hold as an illustration. Helping the torso bend and flex during a variety of other movements is one of its wonderful additional functions. Although the internal and external obliques also work simultaneously when lengthening the trunk, we frequently only focus on the contraction of these muscle groups. Stretching with a back bend is an illustration of this.
What Are Heel Taps’ Advantages?
- Strengthen Body Core
Exercises for the core are crucial because core stability is necessary for overall fitness. Your lower back and part of your upper body are covered by your core. Body balance, posture, and uprightness are all supported by the strength of the torso muscles. Exercises that involve heel tapping are one way to keep these muscles strong, provided you do them with the right form and breathing.
- Strengthen Abs
The front and side abdominal muscles need stability, strength, and agility, which is what heel taps primarily aim to provide. You can get defined, toned abs by strengthening those muscles.
- Enhance Oblique Muscles
Your abdomen’s side and front have slanting muscles called oblique muscles. Unlike other core exercises that focus primarily on the front abdominal muscles, heel tap exercises target a portion of these muscles.
- Improve Spinal Flexibility
Heel taps help your entire torso and lower back muscles in addition to your front and side core muscles. This guarantees improved abdominal muscles and spine stability, lowering the possibility of lower back pain.
- Improve Posture
According to reports, a sizeable portion of Americans lead sedentary lives at their desks, spending most of the daytime hours hunched over computer keyboards. The fact that so many people have poor posture that harms their body structure and self-esteem is not surprising.
Your lower back is better supported when your core muscles are stronger, which helps you maintain proper body alignment.
- No Equipment Required
While many strength trainers use weights, added restraints, dumbbell side bends, cable crunches, and other gym equipment, you can build your own chiseled six-pack without any equipment. Your body weight, a comfortable yoga mat, and a place to lie down are all you need. The decision to increase your training intensity as you advance will be yours. With no equipment required, there’s also no set-up time. It takes only a few seconds to get into the starting position and start a set of heel taps, making it perfect for intense workouts like supersets, circuit training, and HIIT.
- Easy to Learn
It’s simple to learn the heel tap exercise, which involves lying face-up on the floor and tapping your heels while bending your sides. Even though it requires specific breathing and technique, it is a great exercise that you can perform at home without a personal trainer.
- Spine friendly
Your spine is only slightly compressed when you do heel taps properly. For those with mild low back problems, it is frequently advised because it is spine-friendly.
How To Do Heel Touches Correctly
The technique is so crucial for any exercise. For the effort you’re putting in, you want to get the best possible results. If you’re performing this exercise at home or in the gym, we want to make sure you understand how to do it and feel confident doing it.
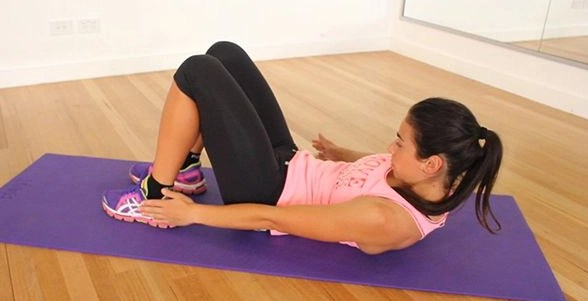
- Lay on your back with your feet apart and flat on the ground to begin. At 90 degrees, bend your knees. Your fingers should be pointing downward as your arms are extended at your sides.
- To crunch forward toward your torso, lift your head. Pull your belly button inward and toward your spine. Keep your neck in a neutral position, eyes pointed upward, and avoid tucking your chin in while holding this position. Start swiveling or bending sideways while reaching one hand at a time toward your heels.
- Squeezing your oblique muscles, continue to alternate each heel touch. Breathe out through your mouth after each tap.
- Every rep should be controlled and slow. To reach the desired time or repetition goal, repeat for 3 to 4 sets. Start with 12–15 repetitions on each side.
Keep a close eye on your body. Stop exercising and talk to your doctor if you start to experience pain or severe discomfort.
Common Mistakes With The Alternating Heel Touch Exercise
You won’t get a proper contraction if you make common errors with this exercise, like not contracting your abdominal muscles. The ultimate goal of the exercise is to keep those obliques engaged.
Make sure not to overexert or strain your neck by tucking your chin down because a portion of this exercise involves holding the rectus abdominis in a static position. Stop and start over with your c-spine (neck) in the most neutral position possible if your neck starts to feel tight.
Improper breathing is another frequent error. Any ab exercise you do needs to provide your abdominals with oxygen, which is accomplished when you breathe in and out. Additionally, it will provide you with the energy needed to complete the entire workout.
How Many Sets & Reps Should I Do For Heel Taps
For a number of reasons, nobody will begin at the same level of fitness. The most crucial thing is to recognize what works best for you and then make adjustments as you advance to challenge yourself further. Knowing what you can physically do, have faith in your own process. The last thing you want to do is hurt yourself, set a difficult goal, and give up.
Beginners should begin with 10–12 repetitions on each side. Try increasing your repetitions as you advance to 12–15 reps on each side. Aim for 15-20 reps per side when beginning at an advanced level.
How To Increase Difficulty Of Heel Touches
There are a few techniques for making heel touches more difficult. Being a little inventive with these implementations will help you get the extra burn you want since it is typically a body-weight exercise. You might achieve your objective to gain more muscle a little bit faster if you make the exercises harder. Here are some suggestions:
- Don’t rush through the repetitions. Instead of 1 second, hold each rep for 2 seconds.
- Exercises can be made more challenging by adding light to moderate weights, such as dumbbells, or by using a resistance band looped in each hand and wrapped around your back.
- To extend the range of each repetition, place your feet closer together or farther apart from your body.
- A more challenging addition is a decline bench, which will unquestionably test your ability to touch the heel with each step.
What Are Heel Taps?
Heel taps are a type of core exercise that works the midsection, abdominals, and other muscles by using the body’s weight as resistance. All fitness routines, from beginner strength training to bodybuilders and weightlifters, can benefit from heel taps.
A quick, easy exercise to achieve the full range of motion only requires your body weight and a yoga mat for comfort. You perform heel taps while flat on your back, with your knees bent and your feet firmly planted on the floor. Your abs, obliques, lower back muscles, and hip flexors are specifically isolated and worked.
Your core is strengthened through regular abdominal muscle contractions. Heel taps can help you achieve sculpted abs if you perform them consistently and with the right form and technique. You can increase the difficulty of the exercise by including weight or resistance as you advance and your level of fitness rises.
Important Safety Guidelines
Although heel taps seem like a simple exercise, they are complex and involve several movements that can go wrong if the improper form is used.
For instance, the motion of side-bending involves lateral flexion, and the motion of rotating can result in injuries like bulging discs, muscle spasms, or compromised, worn spinal joints.
Before beginning any exercise program if you are currently experiencing back pain, you should speak with a doctor. Your doctor can explain to you which muscles are weak and what exercises are the best and safest for you to do.
Avoid holding your breath while performing the heel taps and strictly adhere to the breathing instructions. By doing this, you will starve your working muscles of oxygen, which will reduce the intensity and time of your workout.
Your blood pressure may significantly increase as a result of improper breathing. Instead, maintain even tension in your abdomen throughout the exercise by maintaining a steady breathing pattern that matches your movements.
Keep your lower back straight, avoid arching it, and avoid tensing up your neck muscles. Keep your mind clear of all the effort you put into the exercise. For the exercise, keep your attention on inhaling and exhaling.
Pay close attention to your movements when doing heel taps. Never let your body curve in any way. Avoid stooping to tap your heels by walking in a straight line. Every time you get to the starting position, take a brief moment to breathe deeply before entering the crunch position for the subsequent rep. When each heel touches, take your time. You are prevented from performing the heel taps by that brief pause from using muscle strength instead of momentum.
Wall Press Heel Tap Tips
- Don’t hold your breath; you shouldn’t be using breathing to make up for instability. Learn how to move while staying in place without depending on your breath.
- Be methodical while moving slowly. Control within the physical environment is the aim, not just finishing repetitions.
- Make sure to exhale as the leg extends. In order to avoid lower back hyperextending, the ribs should remain low.
- Always begin with the shortest lever first when performing any variation of the wall press to ensure the lumbar spine remains neutral. In other words, start with the heel tap and work your way up to the 90/90 extension and straight leg version.
Conclusion
For those with a limited amount of free time, heel taps make the ideal in-between-workout exercise. A word of advice: if you used your limited gym time to perform the exercises that require bench presses, squats, and deadlifts. You can perform heel taps and other core bodyweight exercises at home with no special equipment.
When you have a few minutes to spare each week, you can firm up your abs by performing a few 10 to 15-minute sessions.
Then, when you have a few minutes to spare, pull out your gym mat and work on bodyweight exercises for your core at home. To build a stronger, firmer midsection, you only need a few 10 to 15-minute workouts per week.